
This is my very first post, so please be kind!
I thought I'd make a little A Line Dress for a friends little girl.
This one is sleeveless with a scalloped hem. Its fully lined to bag out the hem.
The fabrics I used are from Spotlight, a lovely printed cotton twill and a cotton poplin for lining.
 |
| Fabric |
The pattern I used is my own, link to the Free PDF Pattern download is at the end of the post.
I made this in a size 2. The size chart for this pattern is also at the end of the post.
I used 60cm of each fabric that was 110cm wide.

Fold your fabric in half selvage to selvage, don't follow the cut edge as these can be quite uneven.
The folded edge will be your centre front so you want it to be right on the straight grain, without any twists. If your lining fabric is the same width, place it on top, making sure you line up the folded edges. Place your folded front pattern piece on the fold and pin into place.

I also used a 30cm invisible zip, I actually had a longer that I shortened to 30cm. All you need to do is measure from the top, then stitch over with your machine or by hand, this acts as the new stopper. Then cut off the excess.
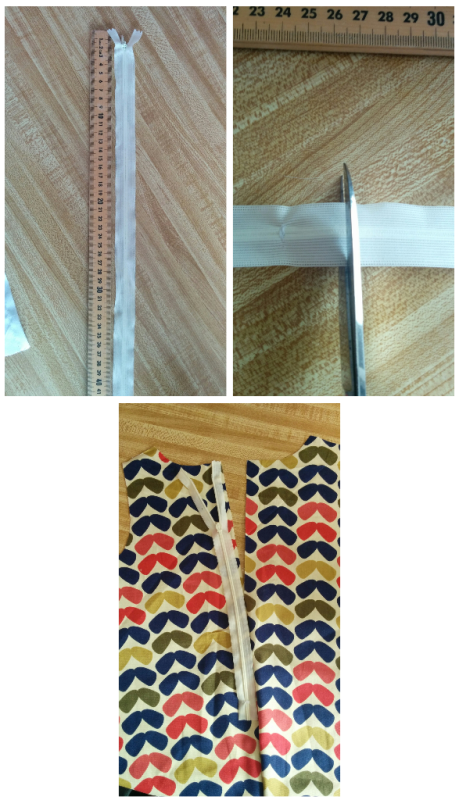

1. Pin the zip to the opening, with about 1cm of zipper tape hanging over the top edge.
This will hold the zip in place.

 |
| Industrial Machine Invisible Zipper Foot |
I also have a little domestic machine and the zipper foot for that one looks like this.
 |
| Domestic Invisible Foot |
Note; If your zipper foot has a pointed front, you may not be able to get really close at the end, so you may need to stitch you back seam after using a a regular zipper foot.

4. Roll the zipper teeth flat with your finger and line up the foot so that the teeth sit in the groove of the foot and the needle is on the tape side of the zip


5. Stitch all the way down, getting as close as you can to the end. Remember to back-stitch to make sure the stitching doesn't come undone.

6. This is where you should press the zip seam open.

7. Next step is to sew the side and shoulder seams and press the open, do this for the self and lining.
Note, I have left an opening in the a side seam of the lining, this will be the last seam to be closed as this dress is all bagged out.


8. The dress (self) being right side out, the lining inside out, place the lining over the self and match up the side and back seams along the hem.

9. Pin the hems together and stitch around all the curves 6mm or 1/4 inch form the edge. I use the edge of my foot as a guide, measure yours to see if its around 6mm from centre to edge.
When you come up to the points, try to do a single stitch across, then turn and continue onto the next curve. It seems strange to do that, but it actually makes turning through neater, giving a crisp point once its bagged out.


10. Snip into each point, getting quite close, being careful not to cut too far.


10. Turn it right side out and press the hem.
Tip; I find that a knitting needle can help push out tricky curved or pointed bagged out seams. I use a large-ish one and run the point on the inside of the seam. a pin can also be useful in getting a neat edge. poke the tip of the pin into the hem seam and pull out at at a few spots.


11. Time to bag out the neckline and armholes. This can get a bit tricky because you've already closed up the hem, This is where you'll use the opening in the lining side seam. Get your nag inside and pinch the neck self and lining together with right sides together at the front notch and pull through the opening. Stitch the neck to the lining leaving about 2 cm open at the centre back to close off later.
With right side up, and the neck seam folded toward the lining, flat-stitch about 1mm from the seam on the lining side. This will help the neck roll back toward the lining, Giving a clean edge, without seeing the lining poke out.


12. Once the neck is bagged out, do the same to the armholes. They'll be quite tricky to do as the shoulders are quite small. I do them section by section, rather than try to stitch in one go which is nearly impossible. Try to flat-stitch the under arm section.
13. Time to close the zip. Turn it inside out as much as you can though the opening in the lining side seam. Have the wrong side of the dress facing up, with lining underneath. pull the lining over by half a centimeter at the top of the zip only. This will create a bit of a bubble but don't worry, this is exactly what you want. Start stitching, following the previous line of stitching. After the first 2 cm, straighten the lining to sit right even with the edge of the dress centre back. Do the same on both sides.


14. Last step of the zip closure is to stitch up the small opening at back neck.Fold the zip seam at the bubble, toward the lining and stitch across the top.


 |
| Finished zip |


This dress is quite roomy, so rather than a standard size chart I've put the actual dress measurements, You can compare there to dresses you may have to work out which size to make.

NOTE - THESE NEED TO BE PRINTED ON A4 SIZE TO BE TRUE TO SIZE
Here is a test page with a 1 inch square, print it and carefully measure the square to test out your printer settings.
TEST PAGE
No comments:
Post a Comment