Wednesday, 1 August 2018

Kids T-shirt Free PDF Pattern UPDATED

This is an update to the original post here.

I've edited the pattern to be easier to print. It now comes as a single file with options in layers to see and print single sizes. I've altered the pattern slightly to be straight rather than A-line.


Note; most of the pattern pieces are halved. In industry garment production patterns that would be a big no no, but in the interest of saving printer ink I've placed the ones that can be mirrored on a fold/half.


Download the new version for FREE here.


To select the size you want to print click on the view layers icon in the top right corner. Click on the box with the eye next to the size to hide a size.


Only size 3 is visible


When printing, Select to print actual size, do not scale. This pattern can be printed in A4 or letter size.
Make sure you print page 1 first and measure the 1" or 5cm square to make sure the settings on your printer are correct.


Happy sewing!


Anna

Monday, 11 April 2016

Kids T-shirt - Free PDF Pattern SIZES 2,3 & 4


Its been quite a long time since I posted anything.
I thought I'd get back to it with an easy one, a kid's t-shirt.
I made this one up for my daughter Emi in a size 2. She's months away from turning 2, but I have found that some brands size 2 fit her perfectly, others can be quite big.
So please check the flat measurements of this t-shirt against a t-shirt that fits your kids well, before deciding on a size.


I'm a sucker for a navy and white stripe, so I had a couple of remnants that I used for these tees.
When cutting a stripe, make sure you match the stripe at side seams. This usually takes up more fabric in adult sizes, but not so much in kids.

1. Overlock the shoulder seams together.


 2. Pin the sleeve in and overlock. The sleeve and armhole seams measure the same, but because of differing grains you'll need to slightly ease the armhole onto the sleeve. I do this by placing the sleeve on top of bodice through the overlocker, the feed dog does the easing while you can slightly stretch/adjust the sleeve as you sew. If you're not confident going straight to overlocker, stitch it on with a straight stitch on your machine first.


3. Once the sleeves are stitched on, pin the side seams from hem all the way through to sleeve hem.
If you're working with s stripe like me, make sure you line up the stripes.
Overlock seams. At this point I overlock the hem and sleeve hems.
The jersey I used has some elastane thought it so it usually curls at the cut edges toward the right side. On a side note, if you're not sure which side of a jersey is the right/face side, look which way it curls. If it doesn't curl, stretch it along the cut edge to make it curl. Should be curling toward the right/face side.


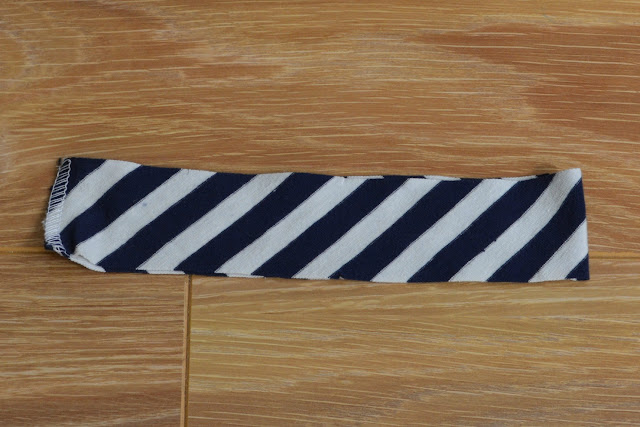
4. Fold the Neck band matching the nicks. I cut mine on the bias as I like that look on striped tops. The band can be cut on either bias or straight grain.


5. I usually use a plain stitch machine to sew on the neck band, stretching it on from nick to nick.
Then I go over the seam with my overlocker. I also like to flat stitch the seam down about 1/8" or
2 mm from the neck seam. It keeps the seam from looking messy after washing. If you are going to stitch it down, make sure to stretch as you sew to prevent the stitching from breaking when the neck is stretched.


6. Finish the hems, I was too lazy to re-thread my coverstich machine so I just plain stitched, stretching slightly to prevent the stitching breaking during wear.


Here are the PDF Patterns.

SIZE 2

SIZE 3

SIZE 4

You might like to download the TEST PAGE to test the size settings on your printer.
Simply print and measure the 1 inch square to make sure you'll get an accurate pattern.


Monday, 3 August 2015

Harem Style Tracksuit Pant for Toddlers - FREE PDF PATTERN SIZES 1-3


Whoa its been cold here in Melbourne! It's definitely trackie season for all!

While I love the colours and prints each season for babies and toddlers, these are also very simple to make yourself.
You can use a brushed track-suiting fabric which is easy to get at any fabric store, or any thicker knit you like.
I used a fabric I had bought a few months ago at Spotlight. I would suggest to pre wash you fabric and dry as you normally would dry a finished garment to pre shrink it. There's nothing worse than spending time making a beautiful garment only to have it shrink after the first wash making it unwearable.

Seed Heritage Ducky Pant

Country Road Stripe Harem Pant


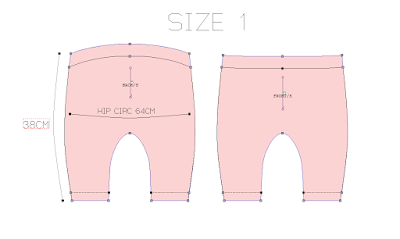
The fabric estimates are as follows. Knit fabrics usually come in 150cm widths, so to make these in a size 1 you'll need approx. 50cm. My fabric was not as wide and I think it shrank is width as well. The usable width was 138cm, but I managed to get 2 pairs of pants out of that.


1. Arrange all the pieces with the right sides facing together and overlock side seams and inside leg seam. I also overlocked the edges as this fabric was curling in and driving me crazy!


2. Cut the elastic and stitch closed into a loop. I suggest just measuring a pair of pants your child fits well. For Emmy, I cut the elastic at 46cm.

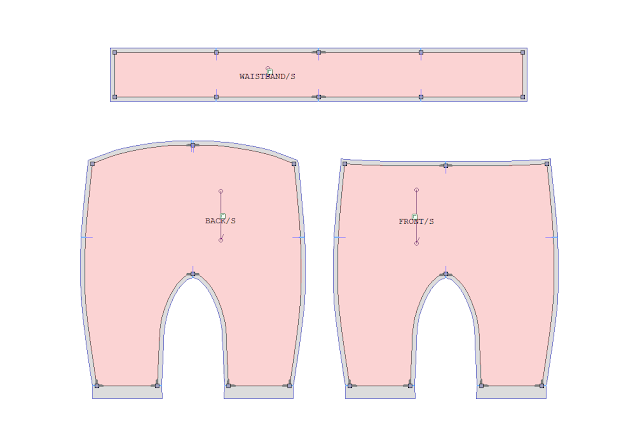
3. Mark and pin the elastic at quarters to the waistband. At the Centre back seam, side seams and Centre Front.
You can alternatively stitch the waistband into a tunnel, leaving a space to thread the elastic through and then stitch close the elastic several a few times.


Once the elastic in encased in the waistband, I like to stretch it a few times to even out the amount of fabric gathered and stitch through the centre of the elastic all around while stretching.
This keeps the elastic from rolling and folding within the waistband.


4. Pin the waistband to the pant at centre back, front and side seams. The back of the pant curves up.
Plain stitch the waistband onto the pant while stretching, do this on a large stitch setting, that way if you swerve a bit either way its easy to unpick. To prevent sliding around or breaking the needle, don't overstretch. You can stretch it a bit more while overlocking to make sure the seam is nice and elastic. You'll probably crack the plain stitching, but that that doesn't matter as the overlocking will keep the seam strong.


5. Overlock and turn up the hem. I just did a plain stitched hem as these are roomy enough around the hem that they don't require a stretchy hem.


Finished Pant

Click below to download your free PDF Pattern - sizes 1-3


You might like to download the TEST PAGE to test the size settings on your printer.
Simply print and measure the 1 inch square to make sure you'll get an accurate pattern.

PATTERN


The finished measurements are:


The hem circumference is 18cm, the waist measurement is up to you. For Emmy, the finished waist measures 44cm on the size 1. 


I'd love to read any comments, feedback or questions

Thursday, 25 June 2015

Update on Tracksuit Pants


After making the first pair of tracksuit pants, I wasn't too happy with the quality of the rib on the cuffs. I decided to make the next pair in the sugar scull print without rib cuffs.
I also changed the pocket construction to get rid of some of the bulk.

Tapered Tracksuit Pants - FREE PDF PATTERN

This is the same pattern as before. Just add length to the leg and remember to add a hem allowance.
I added 12cm plus a 2cm hem. You'll need a little bit more fabric than the previous style.

I used a thin cotton jersey for the pocket lining.

Pocket Lining - Cut 1 pair in thin jersey

The pocket facing is cut out the main fabric, the pattern piece for this is at the end of this post.

Pocket Facing
Starting with the pocket bag and the facing, overlock the edge of the facing and pin to the lining.


Stitch along the overlocked edge, you may want to stitch all around the facing to keep if from folding over as you make the pant.


After you've done this to both, making sure its a pair, overlock the pocket bag together. To form a pocket


From here it's the same method as the previous trackies. 
For the hem finish, overlock the hem, pin it up and stitch up.
I used a coverstitch machine, that's the hem you'll notice on most jersey garments. Like t-shirt hems.
For a similar finish, do a double row of stitching, pull it slightly to prevent the stitching from breaking as you wear them. Alternatively, you can do a zigzag stitch.


Download the pocket facing here


Wednesday, 24 June 2015

Drawstring Goody Bags

I made over 20 of these bags and filled them with lollies and cookies to hand out to kids that came to Emmy's birthday party.


The fabric is a printed cotton drill that I bought at Spotlight.
Each measures 20cm across and 25cm tall. I decided on the size that would suit the purpose and chose a measurement that would use the fabric width without wasting any.
In this case the fabric measured just over 110cm, so at 20cm wide plus 1cm each side for seams, thats 22cm. I could fit 2.5 bags across 110cm.
The length of each bag is 25cm plus 1cm bottom seam and 2cm on top to create the channel for the drawstring, so thats 28cm. I wanted to make 25 bags, so thats 2.8m. I got 3m to allow for mistakes.

Fold over the fabric to a thickness that you'll be comfortable cutting through.
I folded mine into 5 layers, adding a little extra to allow for uneven folds.
Using a chalk or pencil, mark your lines. Pin through the layers, and also use something to weigh the fabric down to stop it from sliding around while you're cutting.


First thing to do is stitch and overlock one long side of each bag.
Then overlock partly on the opposite seam.


On the partly overlocked side, pin the seams 2cm from the top and again 1cm down from that. This will be left unstitched creating the opening for the cord.

Stitch and overlock the rest of that seam as well as the bottom seam.


Close up of opening
Time to finish off the top of the bag. On the side that will have the opening, fold the top down twice at 1cm, holding the seam open.


Fold 1cm


Fold 1cm again


Pin to hold it in place


Do the same on the other side, pin in place.


Stitch the top down, back tacking to prevent unraveling.


Trim any loose threads, turn the bag right side out and press lightly
Using a short bodkin or just a safety pin, thread the cord or ribbon through and knot.


Click below to download the pattern